Alienware is a well known name in the PC market from Dell. It is designed for delivering the ultimate gaming experience to the users through the most advance technology. In the Alienware system everything is customized like Theme, Drive icon, Folder style, Desktop icon and style, Logon screen, Start menu etc and its graphics are better than normal windows 7.
If you get bored with the normal windows 7 theme and its appearance and looking for something new which makes your PC impressive then we suggest you to use Alienware. If you want it in your windows 7 PC then it’s possible to transform windows 7 to Alienware without installing windows.
To enhance the appearance of your computer a dedicated collection of graphics called Alienware Skin Pack is available which will transform your windows 7 PC into Alienware .today we will discussing how to install Alienware Skin Pack and how to transform windows 7 into Alienware without installing windows. How to change windows 7 /8 log in back ground or boot screen
What change will occur after installing Alienware Skin Pack?
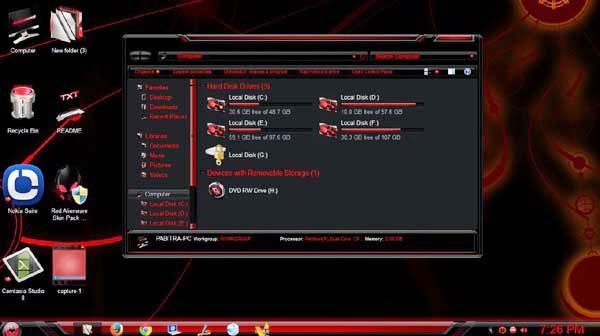
After installing Alienware Skin Pack in your computer, you will be able to enjoy new theme with Alienware style. It will completely change your desktop icon, mouse pointer, drive icon, logon screen, task bar, start menu and all type of icon to Alienware.
This pack also brings a new doc that is specific to Alienware system. Also you can change its looks and placement, make it hide automatically and appear after hovering the mouse near doc’s location.
Steps to install Alienware Skin Pack and transform windows 7 into Alienware
The installation procedure is quite straightforward, but before proceeding it is highly recommended top backup some system32 files from windows PC, Although during installation it backup the files itself. The files are given below
For 32 bit:
C:WindowsSystem32imageres.dll
C:WindowsSystem32shell32.dll
C:WindowsSystem32imagesp1.dll
C:WindowsSystem32zipfldr.dll
For 64 bit:
C:WindowsSystem32imageres.dll
C:WindowsSystem32shell32.dll
C:WindowsSystem32imagesp1.dll
C:WindowsSystem32zipfldr.dll
C:WindowsSysWOW64imageres.dll
C:WindowsSysWOW64shell32.dll
C:WindowsSysWOW64imagesp1.dll
C:WindowsSysWOW64zipfldr.dll
It is recommended to backup the above files because if anything goes wrong during installation or un-installation then the above backup files help you to get rid of the problem. So backup the above files and follow the below steps to install.
- First of all download Alienware Skin Pack for 32 bit or Alienware Skin pack for 64 bit system as your wish. There are many Alienware Skin packs like Red, Green, Blue are available but we recommend Red Alienware Skin pack.
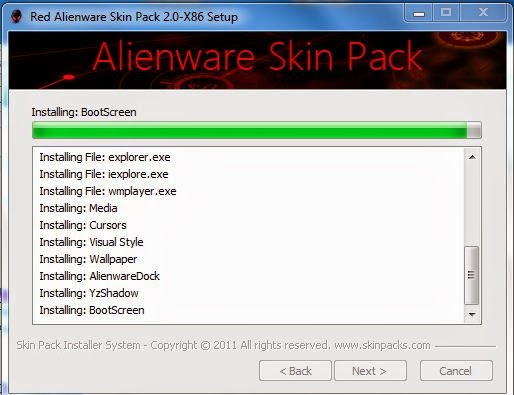
- After downloading just double click on it and start installation. Wait few second for complete installation.
- After installation it ask you to reboot you computer and then you must restart your computer because it is required for the changes to come into effect.
That’s all. After restarting your PC you will see that windows are completely transformed into Alienware.
Steps to Un-installation Alienware Skin pack
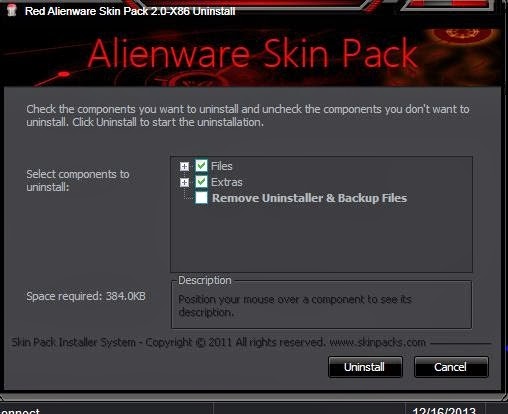
If you want to get back into normal theme and appearance of windows 7 then just un-installation it from control panel of your computer. But during un-installation check the 1st and 2nd box and leave the 3rd box blank and then click on uninstall and reboot your computer.
Conclusion
This is the process to transform windows 7 into Alienware. Here we discussing about Red Alienware Skin pack, also you can use Green Skin pack or Blue skin pack through same way. Hope you must like this, if so then share with your friends and give your feedback here.
During this operation if you face any problem then comment below, we will help you.


Thanks for sharing.