Smartphones are taking over the world. Now a days everyone owns a smartphone and loves to tweak it to make it more customizable. Since the tech geeks have introduced rooting phones, more and more people are doing it to make their phone more customizable.
Every day new smartphone are coming in the market but few of them get popularity and recently one of them is OnePlus 2. After OnePlus 1 the company has launched their second model OnePlus2 and like oneplus1 this smartphone taking the best place due to its quality.
OnePlus2 is ultimately an amazing phone, and it’s being called as 2016 flagship killer. People are crazy about oneplus2 and already lot of people bought this device. Since this device is already populated so people are searching for a step by step tutorial to Root oneplus 2 So that they can get root access of the device.
So if you are one of the oneplus two user and looking for rooting guide then this post is for you Here in this post I am going to tell you, how to root OnePlus two and install TWRP recovery in it..
But before going to process let me tell you what exactly rooting of android means and why you need to root your device ? Rooting the phone means removing restrictions over the apps and settings. It’s like running programs with administrative privileges in Windows.
With a rooted phone, you can run apps that require access to certain system settings, as well as flash custom ROMs to your phone, which add all sorts of extra features. So after rooting your Oneplus two android smartphone you can install root apps and various roms and some best launchers which required root access. So follow the steps below
Warning : Before going to rooting process make sure you’ve backed up your android device’s data.
And one more thing that rooting android voids warranty of the device, so if you care about then don't root your Oneplus two.
Steps To Root OnePlus Two and Install TWRP Recovery
Before starting our process I want to give some advice to you. First of all check if you have at least 80-85% of battery charge because we don’t want the phone dying in the middle of the process.
Second, this is a process in which we are going to modify some of the system settings so before doing anything backup your android data and I will not be responsible for any damage you have done to your phone. If you know what I am doing here and understand it completely, proceed then only.
- So first of all before starting the process, you have to make sure that you have latest drivers installed on your device. Using old drivers may cause your phone to stop working. If you wish to install drivers, then you can download them from below link.
15 seconds ADB Installer v1.4.2
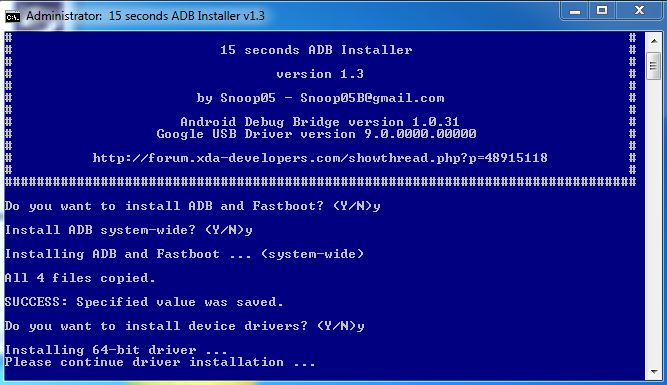
- After installing these drivers on your PC, you will begin to see ADB folder on your C drive (C:/ADB).
- In next step you have to unlock the bootloader of OnePlus Two. Do remember that this step is mandatory. Without unlocking your device you can’t install TWRP on your phone. It is a simple process. Just follow below mentioned step to boot OnePlus Two into bootloader/fastboot mode.
- Switch off your OnePlusTwo and after waiting for 3-4 seconds when the screen is off. Press the Volume Up Button + Power button together until you see anything on the screen. Now your phone is in the fastboot mode. It’s simple as that.
- Next, you have to enable USB debugging mode on your device. To do this perform below steps. Recently Google have changed some of it’s settings so first of all you have to enable the USB debugging mode.If you are running on Android 4.2 or higher, then you can perform below steps to enable USB debugging mode.
- Go to your Phone Settings —>About option.
- Now find Build Number of your device. Scroll down to it and Tap “Build number” seven (7) times continuously and after that your Developer options under Settings are back.
- Go back to setting and now you can see the new “Developer Option” here. Tap on Developer Option and check USB debugging > Ok.
- Now download TWRP Recovery File.
- After downloading locate the downloaded TWRP file and rename that file from Oneplus 2 TWRP Recovery.img to recovery.img and place the file in the ADB folder that we have created in 2nd step.
- Next, you have to download SuperSU root package and after downloading it, transfer the zip file to your OnePlus Two.
- Now again boot your OnePlus Two in bootloader mode and connect your OnePlus Two to PC via USB cable.
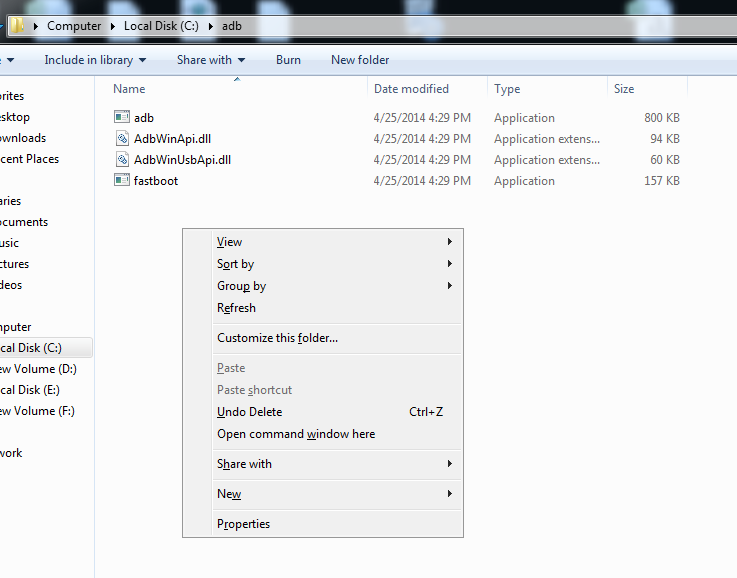
- Now navigate and open the ADB folder in which we have our img file. You have to open CMD window in this folder. If you don’t know how to do that, then simply Hold Shift button on your keyboard and right-click on the empty space of the folder. see below image.
- Now CMD window will open up on your computer. Flash TWRP recovery on your OnePlus Two now. To do this, you will have to run below command.
- fastboot flash recovery recovery.img
- When you have done this, boot your OnePlus Two into TWRP recovery directly by using below command
- fastboot boot recovery.img
- Now your Oneplus 2 will boot on TWRP recovery. Now all you have to do is to click on Install, and flash the SuperSu zip file that we have saved in the phone in step 7.
- Simply, restart your OnePlus Two.
- If everything worked fine, then its party time for you as you have now the TWRP is installed on your device and your Oneplus 2 is rooted.
Conclusion
So this is how you can root your OnePlus Two and install TWRP recovery in it. OnePlus Two is an amazing phone with so many of customizable features, but there are some settings and apps which can’t be changed without rooting it.
So many developers might want to root it. Above method is one of the safest method to root OnePlus 2, but still if you are into a problem and don’t know how to get out of it, then do leave a comment below and I will try to solve your problem as soon as possible. If you know any other method to root OnePlus Two phone, then do mention it below in your comment