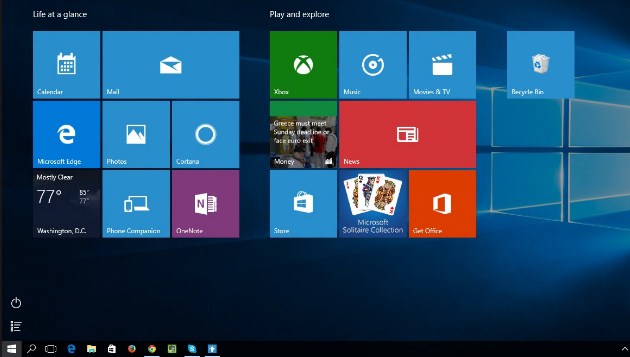
If you are searching for the solution on how to fix start menu not working on Windows 10, then you visited the right place. Lately you might be having troubles with the start menu errors on Windows 10.
It is one of the common problems that most of the user faces into their computer. This is not one of the major problems in your PC, and if you are not able to figure out how to come with errors problem?
Then we have a solution for you as this kind of issues can solved by using some methods. Here you will be able to learn the steps how to fix start menu not working on Windows 10.
Apart from the minor Windows start menu not working errors, when we discussing about the features and interface of Windows, it is almost near to perfect. There is only one common problem that we get to see in Windows 10.
Which is start buttons doesn’t seem to be working smoothly, but you can fix it after you read this article till the end. So, there is nothing to be worried about, as we have come up with a solution of start menu not working fix on Windows 10.
Here check on the various ways which we have provided for you are effective and work perfectly to fix the error.
How To Fix Windows 10 Start Button or Start Menu is Not Working
Here we are going to discus 5 possible methods to fix this start menu issue on windows 10 Computer.
Method 1: Fix Windows Start Menu Not Working on Windows 10 Using System Configuration Utility MS Configuration
Learn by following the steps, to fix Windows start menu issue on Windows 10 with system configuration utility MS configuration.
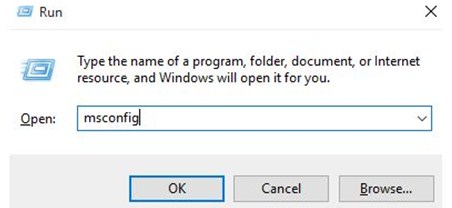
Step 1: At the first place, Hit the Windows button and press the R alphabet key for opening the “Run dialogue box”. Now then type the keyword “msconfig” inside the box, and then select the Ok button by pressing enter key or click by mouse for launching the system configuration.
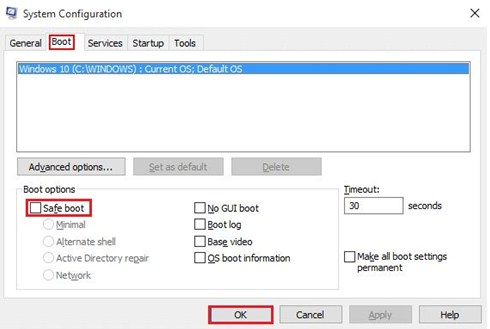
Step 2: Now choose the “Boot” on the screen of the system configuration, in the boot options click to tick on the safe boot box and network as well. Now click on the Ok button to continue.
Step 3: Soon you will be asked to restart which is shown in a dialogue box of the system configuration, click on restart option.
Step 4: After a while your PC will be rebooted safely by itself in the automatic mode. Later on when you log in, make sure to open the “system configuration utility” dialogue box once more. Hold the Windows key along with R key holding it together at the same moment, and then type “msconfig” once again in the Run dialogue box.
Step 5: Now uncheck the safe mode option, by simply clicking on apply and OK button. After that, restarting your computer will fix the start menu not working issues.
These are the steps that you have to take for fixing the start menu not working on Windows 10. Suppose, this one method have not worked out you can try the next method is using the Power Shell method.
Method 2: Fix Windows Start Button Not Working Error on Windows 10 Using the Power Shell
Fix your Windows not working menu with the steps of power shell, check it provided below.
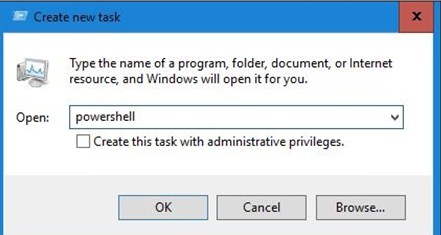
Step 1: Hold the “Windows key” + “X Key” for opening the WinX menu options, and then click on the “Command Prompt (Admin)”.
Step 2: When the “Administrator Windows PowerShell” dialogue box appears on your computer screen, you will have to type the keyword “powershell” and then hit the enter key on your keyboard.
Step 3: Now copy the provided PowerShell command and then paste into the “Command Prompt”, simply by hitting the enter key.
Get-AppXPackage -AllUsers | Foreach {Add-AppxPackage -DisableDevelopmentMode -Register “$($_.InstallLocation)\AppXManifest.xml”}
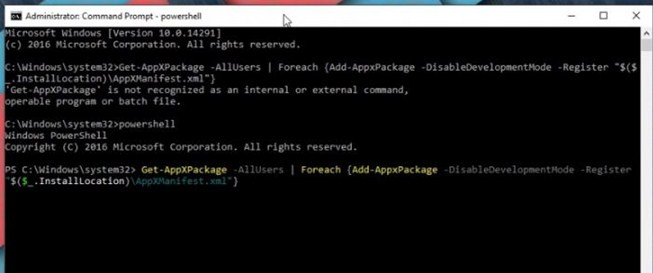
Step 4: Wait for a while until the PowerShell to perform and fulfill the command, some errors may occur in red color just ignore them. Now click on the “start” option.
After the whole step is complete you can see for yourself, whether it works or not. In case, this one does not work either, try the other one using Rebuild Index.
Method 3: How To Fix Start Menu Not Working on Windows 10 With Rebuild Index?
Since, you have already tried the powershell method in your PC. Try using rebuild index to fix the errors caused in the Windows 10 start menu.
Step 1: Go to start menu/start button and search for Indexing options. You can also go to control panel and click on the Indexing options.
Step 2: There you will see advanced option. There below the Index settings you can see a Rebuild button where you need to click.
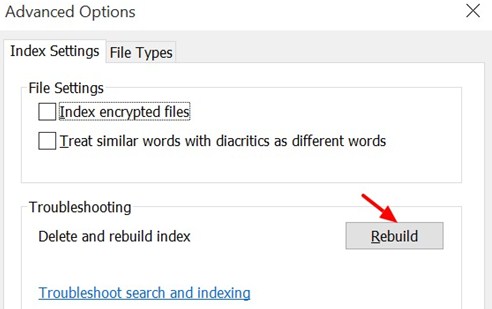
Step3: There you will see a confirmation box where you need to click on the Ok button. Now wait until windows complete the procedure. It might take couple hours so keep patience.
Method 4: How To Fix Windows 10 Start Menu By Creating Shortcut?
It is perhaps one of the simplest method which are easy to follow and perform. Check out the steps shown below.
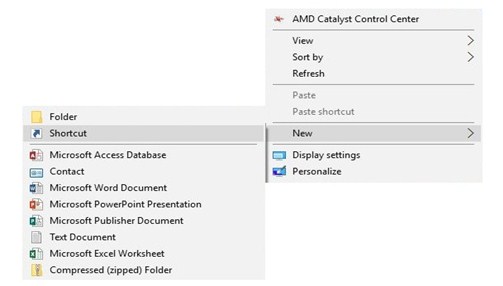
Step 1: First of all, make a right click on the screen of your desktop, now choose new and select then select the shortcut.
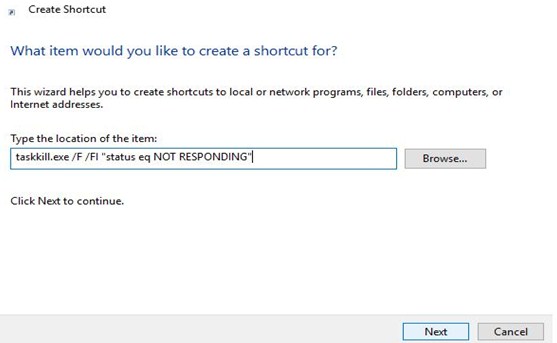
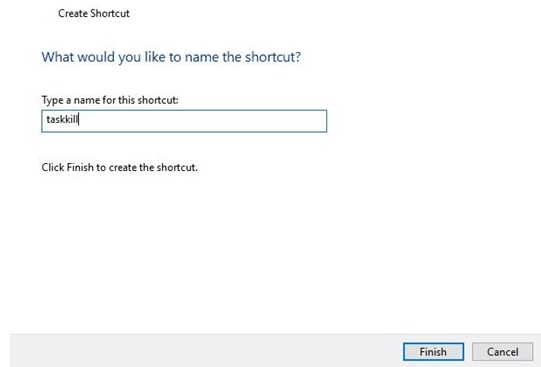
Step 2: Now type the command “ taskkill.exe /F /FI” status eq NOT RESPONDING” into the location field and then select on the Next option.
Step 3: Now you will have to provide a shortcut along with the name that you would like to, and then click on the finish button.
Step 4: Now pin the shortcut option on the taskbar by dragging it using your mouse.
If this method does not work as well as for you, then you should try the next method and that is using file checker tool.
Method 5: How to Fix Start Menu Not Working on Windows 10 Using System File Checker Tool?
Try fixing your Windows 10 menu by using the file checker tool. Follow the steps as mentioned below
Step 1: At first, press the Windows key in your PC keyboard, and also X key at the same tie for opening the winX menu. Now select to click on the “Command Prompt (Admin)’’.
Step 2: in the next step, in the Command Prompt you will have to type sfc/scannow and then hit the enter button.
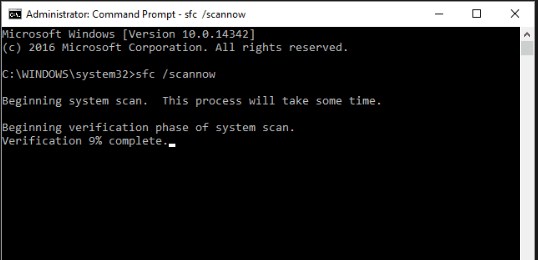
Step 3: Now it will scan all of the files which are protected and then replace the corrupted files along with a cached copy. This process will take a little time to complete be patient and wait for it, to get done.
After a while the Windows 10 start menu errors will be completely solved, and you will be run your PC smoothly.
Conclusion
Here you’ve learnt how to fix start menu not working on Windows 10 in several ways. Apply any one of the above mentioned methods to fix the errors in your Windows 10 start menu.
Hope all the methods mentioned above works out and if it is not then. Some of the other methodss to fix the problems is uninstalling the Dropbox and then disabling the Auto start option.
You can also try out the uninstall ccleaner or use the Avast Antivirus into your Windows 10.
Also Check: Windows 10 Taskbar not working fix